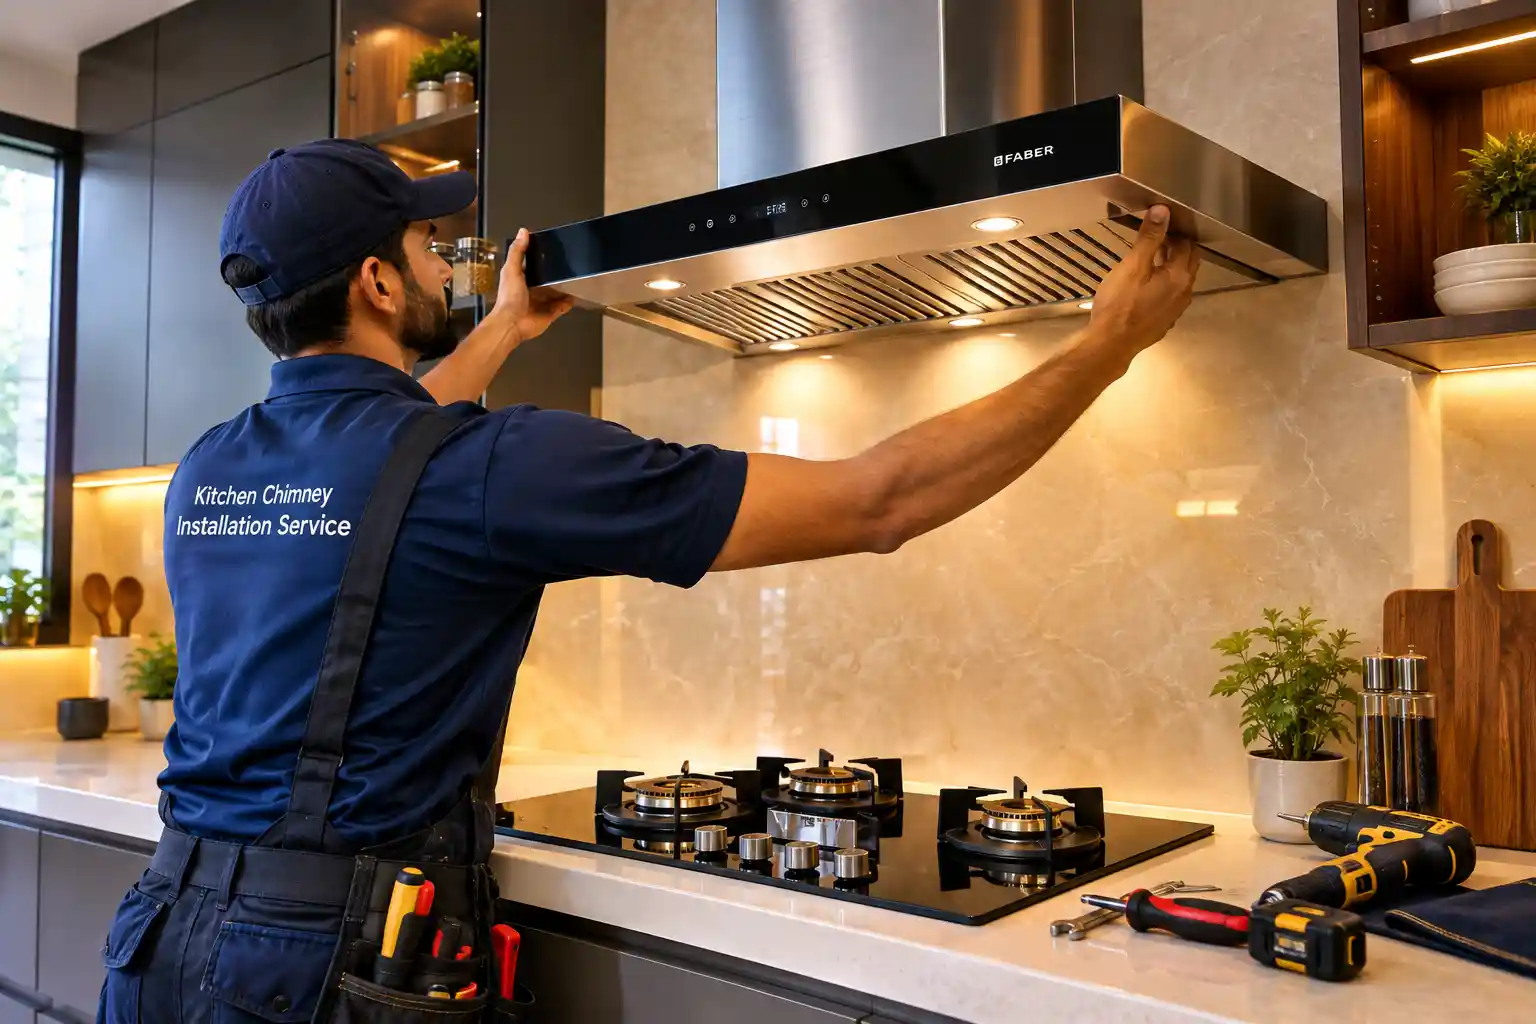
The chimney arrived. The box is open. And suddenly there are 12 screws, a folded instruction sheet printed in four languages at font size 6, and a duct pipe that looks nothing like the wall you need to attach it to.
I’ve been there. My first chimney installation took an entire Saturday, two failed wall anchor attempts, and one very patient friend who happened to own a drill. By the end of it, the chimney was up, but the duct had a bend in it that I later learned was costing me about 15% of my suction power.
The second time around, I knew what I was doing. The whole job took under two hours.
Kitchen chimney installation isn’t complicated once you understand the logic behind it. The height matters. The duct route matters. The wall anchors matter. And for ducted models especially, getting these details right from the start determines how well the chimney actually performs for the next 8 to 10 years.
This guide covers everything: the correct chimney installation height from your stove, how to route the duct properly, what electrical setup you need, the difference between ducted and ductless installation, common mistakes that hurt performance, and when hiring a professional is the smarter call. Before installation, if you’re still deciding which chimney type to buy, our Types of Kitchen Chimney Guide walks through every option. And if suction power is still a question, the Chimney Suction Power Guide helps you calculate the right m³/hr for your kitchen.
The Single Most Important Number: Chimney Height from the Stove
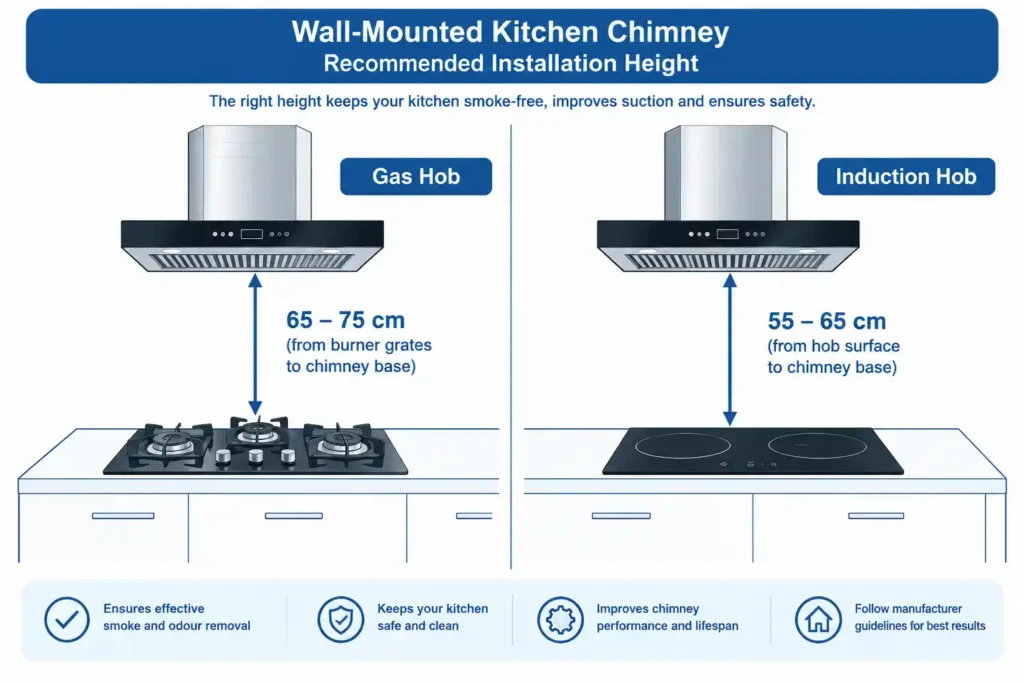
Get this wrong and everything else you do right won’t matter. The kitchen chimney installation height determines whether the chimney captures smoke efficiently or lets it drift into the kitchen before it can be pulled in.
The standard recommendations are:
For a gas hob: 65 to 75 cm from the top of the burner grates to the base of the chimney.
For an electric or induction hob: 55 to 65 cm from the cooktop surface to the base of the chimney.
Why the difference? Gas burners sit higher off the hob surface than induction or electric coils, so the effective flame and smoke source sits higher above the hob surface. Induction hobs sit flat, so the chimney can be positioned slightly lower without risk.
Too low and the chimney becomes a heat hazard. The motor and filters are not designed to operate in direct contact with cooking heat. Too high and the smoke disperses horizontally before the chimney’s suction field can capture it, especially during heavy Indian cooking where smoke volume is high and fast.
Most chimney manufacturers print the recommended height range on the box and in the manual. Always check your specific model. Some premium models have slightly different requirements.
A practical tip: before drilling a single hole, use a measuring tape and pencil to mark the chimney base position on the wall. Hold the chimney body up against the wall (with a second person helping) and verify the marked height against the hob. Adjust if needed. Drilling in the wrong spot means filling holes and starting again.
Centering the Chimney Over Your Hob
Height gets most of the attention, but horizontal positioning matters just as much and is easy to get wrong in non-standard kitchen layouts.
- Straight-line kitchens: Centre the chimney directly above the midpoint of your hob, not the midpoint of the counter if the hob is offset to one side.
- Parallel kitchens: Position the chimney along the counter that actually holds the hob and burners, not the opposite counter, even if that side has more visual symmetry with the room.
- L-shaped kitchens: Place the chimney above the longer arm of the L if that’s where the hob sits, and make sure hood width covers all burners, not just the ones closest to the corner.
- Island kitchens: The chimney needs to be centred over the island hob from a ceiling mount, with equal suction coverage on all sides since there’s no wall to help contain smoke.
A chimney installed a few inches off-centre from the hob consistently lets smoke escape from the uncovered burner, no matter how strong the suction rating is. Measure from the centre of your hob, not from a wall edge or cabinet line that happens to look central.
Ducted vs Ductless Installation: Two Very Different Jobs
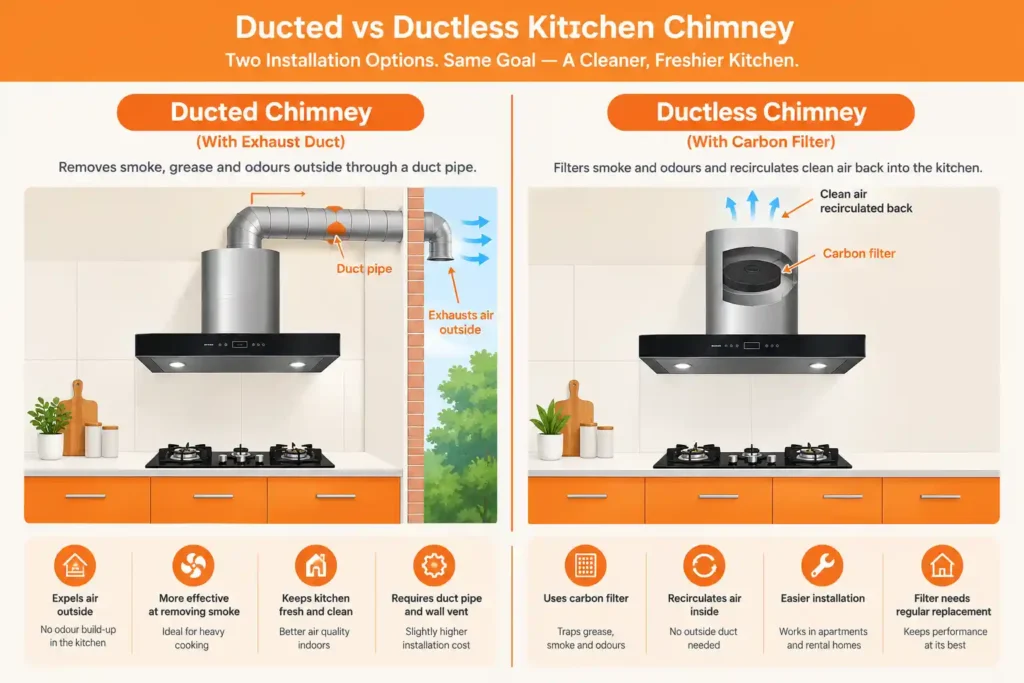
Before picking up a drill, you need to know which installation type you’re doing. The two are fundamentally different in terms of complexity, tools needed, and what determines a good result. For a full comparison of which type performs better for Indian cooking, see our Ducted vs Ductless Chimney Guide.
A ducted chimney installation involves mounting the chimney body, connecting a duct pipe from the chimney’s exhaust outlet through the wall or ceiling to the outside, and sealing the exterior vent. The duct route, bends, and materials all affect real-world suction performance. This is the more involved installation.
A ductless chimney installation involves only mounting the chimney body to the wall and connecting it to a power point. No duct, no wall penetration. The chimney filters air internally through a baffle filter and carbon filter, then recirculates clean air back into the kitchen. Much simpler, but less effective for heavy Indian cooking.
| Ducted Installation | Ductless Installation | |
| Complexity | Moderate to high | Low |
| Tools needed | Drill, masonry bit, duct pipe, wall grille | Drill, wall anchors only |
| Wall penetration | Yes, for duct exit | No |
| Professional recommended | Yes for most setups | Optional |
| Performance for Indian cooking | High | Moderate |
| Ongoing cost | Low | Carbon filter every 3 to 6 months |
What You Need Before Starting Installation
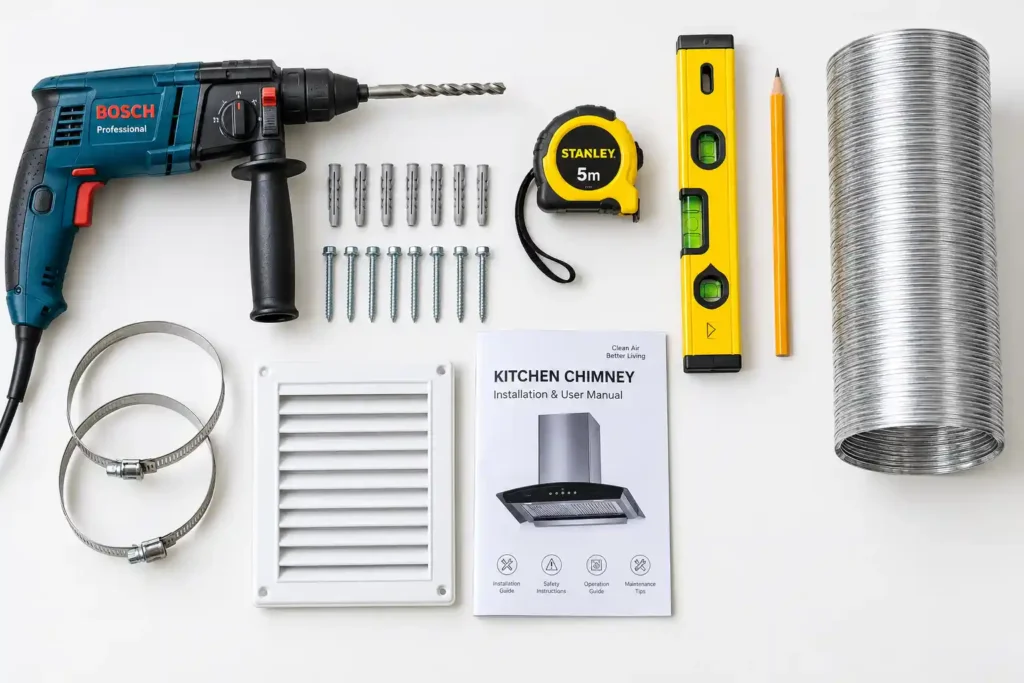
Going in without the right tools is how a 2-hour job becomes a 6-hour job. Here’s what you need.
For both ducted and ductless installation: a power drill with masonry bits (8 mm and 10 mm at minimum), wall anchors and screws matched to your wall type (concrete walls in Indian homes need heavy-duty anchors), a measuring tape, a spirit level (a chimney that isn’t level looks wrong and the oil tray drains incorrectly), a pencil for marking, and your chimney manual open and within reach.
For ducted installation only: rigid aluminium duct pipe in the diameter specified by your chimney (usually 150 mm or 200 mm), duct clamps or tape to seal joints, a wall grille or vent cap for the exterior duct exit, wall plugs if running duct through masonry, and a jigsaw or grinder if cutting through a wall that doesn’t already have a duct hole.
What not to use: flexible accordion duct (the silver corrugated type sold cheaply at hardware stores). It restricts airflow far more than rigid duct and reduces effective suction by up to 20%. Always use rigid aluminium pipe for the main duct run.
Check Your Wall Type Before You Drill
Most installation guides assume a solid concrete wall and stop there, but not every Indian kitchen wall is the same, and this is worth checking before you buy anchors, not after a bracket pulls loose.
- Solid concrete or brick: Standard heavy-duty plastic or metal wall anchors with masonry screws work well, as described in the steps below.
- Hollow block or lightweight partition walls: Common in some newer apartment constructions. Standard anchors can pull loose under the chimney’s weight over time. Use hollow-wall or toggle anchors rated for the chimney’s full weight, not just what feels secure on installation day.
- Weak or crumbling plaster: If the drill bit goes in easily and the hole crumbles rather than holding a clean edge, the plaster layer is too weak to anchor into directly. A chemical anchor (resin-based) or anchoring into the structural wall behind the plaster is needed, this is a case where hiring a professional is worth the cost.
- Tiled walls: Use a tile-rated masonry bit to start the hole cleanly, standard bits can crack tiles. Mark and double-check position before drilling, since a cracked or chipped tile cannot be undone.
A chimney weighs 8 to 18 kg and stays mounted for a decade, this is not a place to guess. If you’re unsure what’s behind your kitchen wall finish, a quick test drill with the smallest bit before committing to full-size holes tells you what you’re working with.
Step-by-Step: How to Install a Wall-Mounted Ducted Kitchen Chimney
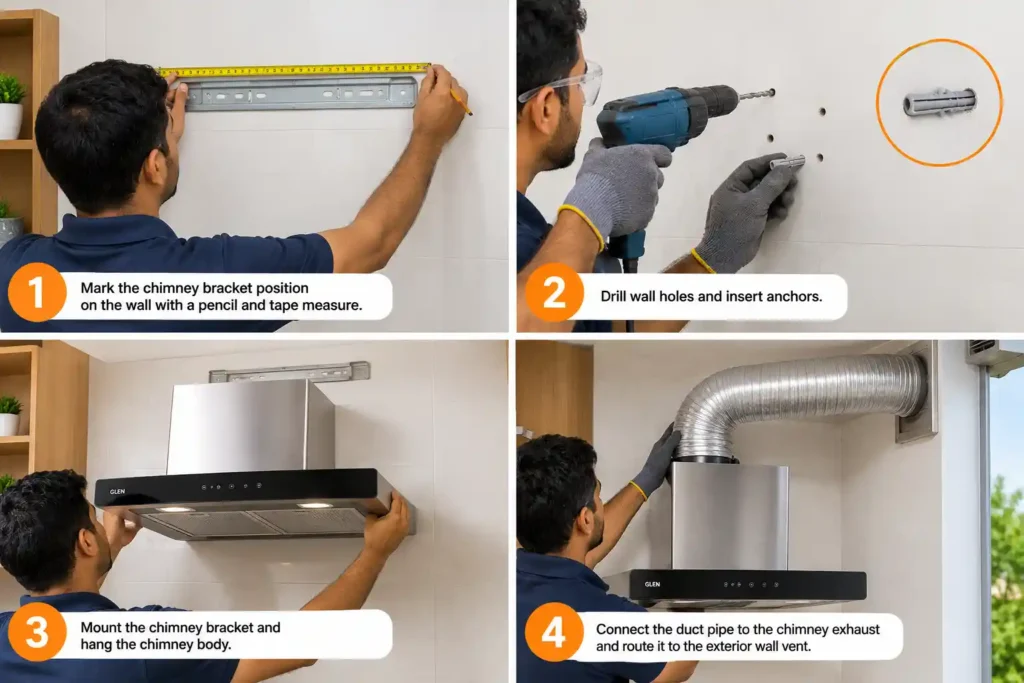
This is the most common installation scenario in Indian homes. A wall-mounted chimney above a gas hob, vented through the kitchen wall to the outside.
Read the manual fully before doing anything. Every chimney model has slightly different bracket dimensions, screw spacing, and duct outlet positions, so use the manufacturer’s measurements rather than estimating.
- Mark the wall bracket holes at the correct height (65 to 75 cm from hob to chimney base). Use a spirit level to confirm the marks are perfectly horizontal, even 2 to 3 degrees off level will be visible once mounted and means re-drilling to fix.
- Drill the marked holes using a masonry bit sized for your wall anchors. In concrete walls, use 8 to 10 mm carbide-tipped masonry bits and heavy-duty plastic anchors, hammered flush into the wall.
- Mount the wall bracket using the screws provided. Give each screw a firm tug after tightening to confirm it’s secure, the bracket needs to reliably hold 8 to 18 kg for years.
- Hang the chimney body onto the bracket following the manual’s instructions. Most wall-mounted chimneys slide on from above and lock with a set screw. Have a second person hold the chimney while you secure it.
- Route the duct. Connect the duct pipe to the chimney’s exhaust outlet using a clamp. Run it as straight and short as possible, every 90-degree bend reduces suction by 10 to 15 percent, so plan the route to minimise bends.
- Create or confirm the exterior duct hole. If the exterior wall doesn’t already have one, this needs a core drill (not a standard masonry bit) and is best handled by a professional. The hole diameter should match your duct pipe plus about 10 mm clearance.
- Fit the exterior wall grille or vent cap over the duct exit to keep birds, insects, and rain out when the chimney isn’t running. Seal around it with exterior-grade silicone sealant.
- Seal all interior duct joints with aluminium foil tape, not regular tape or duct tape, which degrades quickly near heat. Leaky joints reduce suction and let grease-laden air escape into the wall cavity.
- Connect to power and test. Run all three speed settings, then confirm airflow at the exterior vent grille by holding a piece of tissue near it on high speed, it should pull toward the vent clearly.
Step-by-Step: How to Install a Ductless Kitchen Chimney
Ductless installation is considerably simpler. The chimney body mounts to the wall exactly as above (mark, level, drill, anchor, mount bracket, hang chimney). The only difference is that there’s no duct to route.
Confirm the carbon filter is properly seated inside the chimney before the first use. Most ductless chimneys come with the carbon filter pre-installed or clearly labelled for installation in the manual. A ductless chimney running without its carbon filter does nothing for odour control.
Connect to power and test all speed settings. That’s it.
One thing worth noting: ductless chimneys recirculate air rather than venting outside, so the recirculated air returns into the kitchen. This means the kitchen stays slightly warmer during cooking and some residual odour remains in the room. For heavy Indian cooking, a ductless chimney with at least 1200 m³/hr suction compensates for the reduced efficiency compared to ducted.
For full guidance on how to maintain a ductless chimney’s carbon filter and keep suction performance up over time, see our Kitchen Chimney Cleaning and Maintenance Guide.
Duct Materials and Routing: What Actually Affects Your Suction
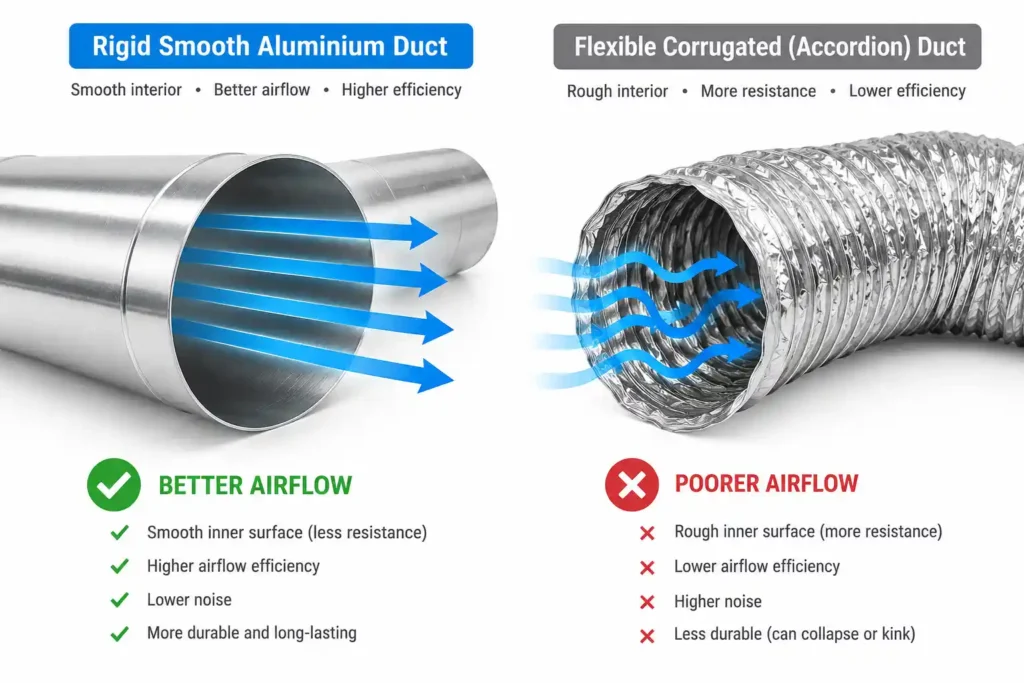
This is where most DIY chimney installations lose performance without the owner ever knowing why.
The duct is not just a pipe. It’s the path the filtered air travels from the chimney to the outside. Any resistance in that path directly reduces suction at the cooktop level. And resistance comes from three sources: duct material, duct length, and bends.
Duct material matters more than people expect. Rigid aluminium or galvanised steel duct has a smooth interior that air flows through with minimal friction. Flexible corrugated duct has a ridged interior that creates turbulence at every ridge. Studies on HVAC airflow consistently show that flexible duct reduces effective airflow by 15 to 25% compared to rigid duct of the same diameter and length. For a kitchen chimney suction power rated at 1200 m³/hr, that’s a loss of 180 to 300 m³/hr before you’ve even accounted for filter resistance.
Duct diameter must match the chimney’s exhaust outlet. Using a smaller diameter adapter to fit a different duct size creates a restriction that permanently limits suction. Always use the diameter specified in the chimney manual.
Duct length and bends are the other major factors. As a practical guide:
| Duct Configuration | Approximate Suction Loss |
| Straight duct, up to 2 metres | Minimal (5 to 8%) |
| Each additional metre of straight duct | Additional 3 to 5% |
| Each 90-degree bend | 10 to 15% |
| Each 45-degree bend | 5 to 8% |
| Flexible accordion duct (any length) | 15 to 25% additional |
So a chimney with a 3-metre duct run, two 90-degree bends, and flexible duct could be losing 40 to 55% of its rated suction by the time air reaches the exterior vent. A chimney rated at 1200 m³/hr in that situation might be delivering 540 to 720 m³/hr at the cooktop.
The fix is to plan your duct route before installation. Minimise length. Use 45-degree bends instead of 90-degree bends wherever possible. Use rigid aluminium duct throughout. And if the route unavoidably has multiple bends, buy a chimney with higher suction than you think you need to compensate.
Electrical Requirements for Kitchen Chimney Installation
Most kitchen chimneys in India run on a standard 230V, 50Hz supply and draw between 150W and 250W. This is well within what a standard 5-amp or 15-amp earthed socket can handle.
A few things to confirm before plugging in:
The socket must be earthed. Chimneys have metal bodies and motors. An unearthed socket is a shock risk. If your kitchen doesn’t have an earthed socket near the chimney position, have an electrician add one before installation. Earthing requirements for home appliances in India follow Bureau of Indian Standards guidelines, this isn’t a step worth skipping to save time.
The socket should be positioned above the chimney, not below it or at hob level. Most chimneys have a power cord that exits from the top of the unit. Placing the socket above the chimney keeps the cord hidden inside the chimney’s duct cover or body casing.
Never use an extension cord or multi-plug adapter for a chimney. The chimney should have its own dedicated socket. A chimney running on an overloaded multi-plug is a fire risk, and the motor can be damaged by voltage fluctuations on a shared circuit.
If your kitchen circuit trips frequently after chimney installation, the circuit may be overloaded. Have an electrician check the circuit load and add a dedicated line for the chimney if needed.
Chimney Installation Height for Different Kitchen Configurations
Not every kitchen is a standard layout with a flat hob at counter height. Here are the height guidelines for common Indian kitchen configurations.
For a standard counter-height gas hob (counter at 85 to 90 cm from floor): chimney base should be at 150 to 165 cm from floor level, which puts it 65 to 75 cm above the burner grates.
For a raised platform or island hob: measure from the burner grate surface of your specific hob and add 65 to 75 cm for gas, 55 to 65 cm for induction. The floor-level number will be different from a counter-height setup.
For built-in chimneys inside cabinetry: follow the manufacturer’s clearance specifications precisely. Built-in chimneys have tighter clearance requirements than wall-mounted models because they sit inside an enclosed cabinet. Insufficient clearance above a built-in chimney causes motor overheating.
For island chimneys: the ceiling mount height is calculated from the ceiling down, and the chimney body should position its base at 65 to 75 cm above the island hob. Island chimneys require ceiling heights of at least 3 metres to maintain this clearance while keeping the chimney body at a comfortable visual height.
Common Kitchen Chimney Installation Mistakes and How to Avoid Them
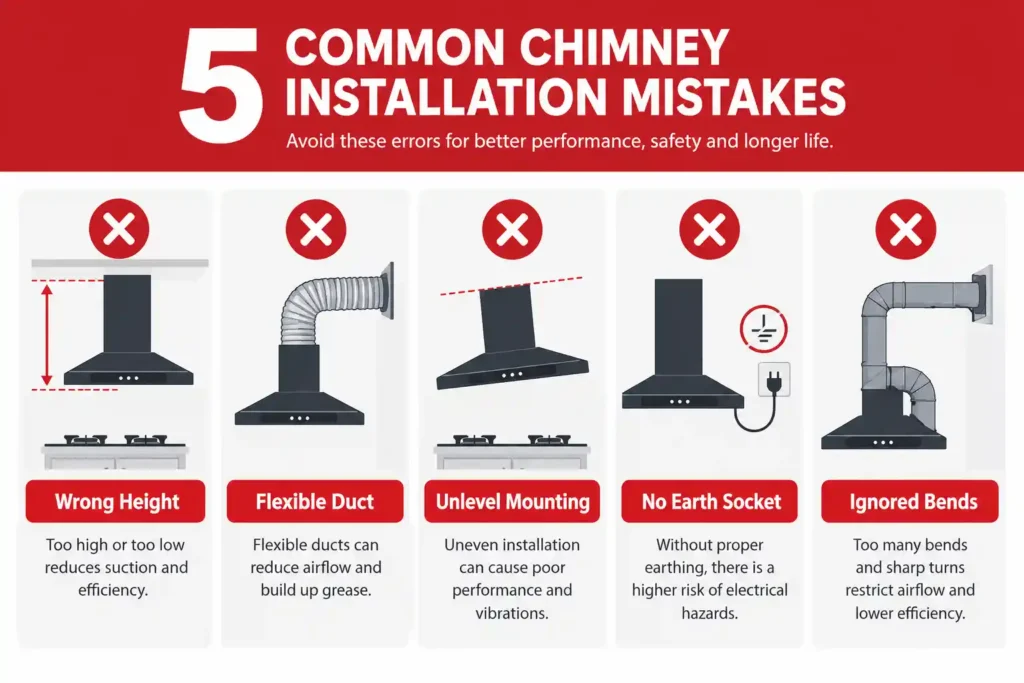
Installing the chimney at the wrong height is the most common mistake and the hardest to fix after the fact. Measure twice, drill once. Mark the position, hold the chimney body up against the wall with a second person, and verify height before committing to drilling.
Using flexible accordion duct instead of rigid aluminium duct is the second most common mistake. It’s cheaper and easier to route around corners, which is why it’s tempting. But the suction loss is real and permanent until the duct is replaced.
Mounting the chimney without checking for level means an unlevel unit. The oil tray in the chimney drains to one side, can overflow from one corner before the other, and the chimney looks visually off against horizontal kitchen tiles and cabinets. Always use a spirit level.
Ignoring duct joint sealing means leaks inside the wall or ceiling cavity. Grease-laden air escaping through unsecured duct joints leaves residue inside walls and reduces suction. Seal every joint with aluminium foil tape rated for high-temperature use.
Placing the power socket below the chimney or at hob level leaves the cord exposed and creates a mess. Position the socket above the chimney body, hidden by the duct cover or chimney casing.
Not testing before finishing means finding problems after the walls are patched and everything is tidy. Run the chimney on all three speeds and hold tissue near the exterior vent to confirm airflow before declaring the job done.
DIY vs Professional Installation: When to Call a Technician
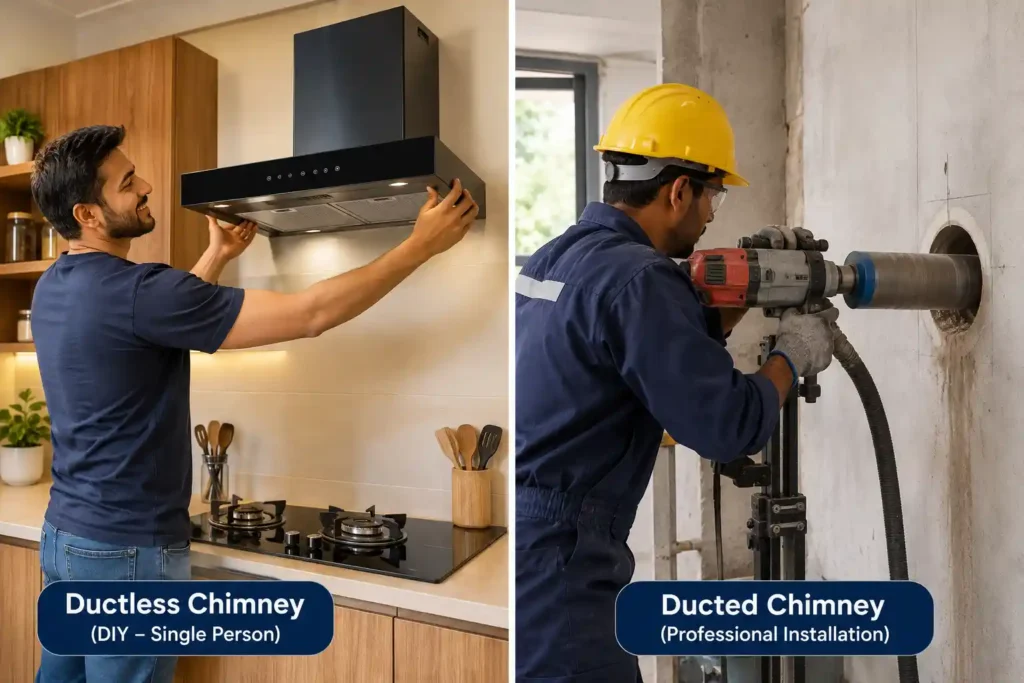
Ductless chimney installation is a realistic DIY job for anyone comfortable with basic drilling and wall anchoring. The steps are: mark, drill, anchor, mount, plug in. No duct work, no wall penetration, no specialist tools needed. If you’ve mounted a TV bracket or a shelf on a concrete wall before, you can install a ductless chimney.
Ducted chimney installation is more involved. If your kitchen wall already has a duct hole from a previous chimney or exhaust fan in the right position, it’s manageable as DIY. But if you need to core drill through a concrete or brick wall, that requires a core drill (not available in a standard toolkit), creates substantial dust, and can damage plumbing or wiring hidden in the wall if you don’t know what’s there. In that situation, hire a professional.
Most chimney brands in India offer paid installation services at the time of purchase. Elica, Faber, Hindware, and Glen all have authorised installation networks. The cost typically runs Rs. 500 to Rs. 1,500 for a standard wall-mounted installation, and Rs. 1,500 to Rs. 3,000 or more for island chimneys or installations requiring new duct holes.
Using an authorised brand technician also has a practical benefit: if anything goes wrong during installation (a bracket that doesn’t sit right, a duct connection that leaks), it’s their problem to fix, not yours.
| Situation | DIY or Professional |
| Ductless chimney, existing socket | DIY is fine |
| Ducted chimney, existing duct hole in right position | DIY is manageable |
| Ducted chimney, need new duct hole through concrete | Professional strongly recommended |
| Island chimney installation | Professional recommended |
| Built-in chimney fitting into cabinetry | Professional recommended |
| Electrical socket needs adding | Licensed electrician required |
After Installation: First Use and Break-In
Before cooking, run the chimney on high speed for 5 to 10 minutes with just the motor running and no cooking below it. This burns off any manufacturing residue on the motor and confirms all connections are secure. A slight burning smell on first use is normal and clears within a few minutes.
Check the exterior vent grille from outside during this first run. You should see (or feel) airflow coming out. If there’s no airflow at the exterior, there’s a duct connection problem to diagnose before using the chimney for cooking.
After the first week of cooking, check all duct joints and the exterior grille again. Heat cycling can loosen joints that seemed tight at installation. Re-seal any that show signs of movement.
Then set your cleaning schedule. For daily Indian cooking, the baffle filter needs washing every 15 to 20 days. Our Complete Chimney Cleaning Guide has the full schedule and step-by-step cleaning process.
Kitchen Chimney Installation Cost in India
| Installation Type | Approximate Cost |
| Ductless chimney, standard wall mount | Rs. 500 to Rs. 800 |
| Ducted chimney, existing duct hole | Rs. 800 to Rs. 1,500 |
| Ducted chimney, new duct hole required | Rs. 1,500 to Rs. 2,500 |
| Island chimney with ceiling duct | Rs. 2,500 to Rs. 4,000 |
| Built-in chimney fitting | Rs. 2,000 to Rs. 3,500 |
| Electrician for new socket | Rs. 300 to Rs. 800 additional |
These are indicative costs based on standard rates across major Indian cities in 2025. Costs in metro cities (Mumbai, Delhi, Bengaluru) tend to run 20 to 30% higher than smaller cities. Always get a written quote before authorising work.
For context on where installation cost fits into the overall cost of owning a kitchen chimney, see our Kitchen Chimney Price Guide for India.
People Also Ask: Kitchen Chimney Installation FAQs
1. What is the correct height to install a kitchen chimney?
The standard kitchen chimney installation height is 65 to 75 cm from the top of gas hob burner grates to the base of the chimney. For electric or induction hobs, 55 to 65 cm from the cooktop surface to the chimney base. Installing outside this range either creates a heat hazard (too low) or reduces smoke capture efficiency (too high).
2. Can I install a kitchen chimney myself?
A ductless chimney is a realistic DIY installation for anyone comfortable with basic drilling and wall anchoring. A ducted chimney is manageable DIY if a duct hole already exists. If you need to core drill through a concrete wall, hire a professional. Island and built-in chimneys are best installed by authorised technicians.
3. What type of duct should I use for chimney installation?
Always use rigid aluminium duct pipe in the diameter specified by your chimney (typically 150 mm or 200 mm). Avoid flexible accordion duct: it reduces effective suction by 15 to 25% due to turbulence created by the corrugated interior.
4. How much does kitchen chimney installation cost in India?
A standard wall-mounted ducted chimney installation by an authorised technician typically costs Rs. 800 to Rs. 1,500 if a duct hole already exists. If a new duct hole is needed through a concrete wall, expect Rs. 1,500 to Rs. 2,500. Island chimney installation runs Rs. 2,500 to Rs. 4,000.
5. Does the number of duct bends affect chimney suction?
Yes. Each 90-degree bend in the duct reduces effective suction by approximately 10 to 15%. A duct run with two 90-degree bends and flexible duct can reduce real-world suction by 35 to 50% from the chimney’s rated capacity. Minimise bends, use 45-degree bends where possible, and always use rigid duct.
6. What electrical socket does a kitchen chimney need?
Most chimneys need a standard 5-amp or 15-amp earthed socket at 230V. The socket must be earthed. Unearthed sockets are a safety risk with metal-bodied chimney units. Position the socket above the chimney body so the cord is hidden inside the duct cover. Never use an extension cord or multi-plug adapter.
7. Where should the power socket be positioned for a kitchen chimney?
The socket should be above the chimney body, hidden behind or inside the duct cover. This keeps the power cord concealed and protects it from cooking heat. A socket at hob level or below forces the cord to run exposed down the wall.
8. How long does kitchen chimney installation take?
A standard ductless chimney installation takes 30 to 60 minutes for an experienced person. A ducted chimney installation with an existing duct hole takes 1.5 to 2.5 hours. If a new duct hole needs to be drilled through a concrete wall, add 1 to 2 hours for that work.
9. Can a kitchen chimney be installed without drilling into the wall?
Not practically for a permanent installation. Wall anchors into the wall are required to safely support the chimney’s weight (8 to 18 kg). Adhesive mounts are not strong enough. For renters who cannot drill, some brands offer freestanding chimney alternatives, though these are uncommon in the Indian market.
10. What should I check after installing a kitchen chimney?
Run the chimney on high speed and check for airflow at the exterior vent grille from outside. Confirm all duct joints are sealed with aluminium foil tape. Check that the unit is level. Test all three speed settings and the lighting. After the first week of cooking, recheck duct joints for any movement and reseal if needed.
11. Where should a kitchen chimney be positioned relative to the hob?
Centred directly above the hob’s midpoint, not the counter’s midpoint if the hob sits off to one side. In parallel kitchens, position it along the counter that actually holds the burners. In L-shaped kitchens, place it above the longer arm if that’s where the hob is, and make sure the hood width covers every burner.
12. What if my kitchen wall isn’t strong enough for a chimney bracket?
Hollow block or lightweight partition walls need toggle or hollow-wall anchors rated for the chimney’s full weight, standard anchors can pull loose over time. If plaster crumbles when you test-drill rather than holding a clean hole, a chemical resin anchor or anchoring into the structural wall behind the plaster is needed, this situation is worth hiring a professional for.
Sources & About This Guide
Height, duct-loss, and electrical specifications in this guide are cross-checked against installation manuals from Elica, Faber, Glen, and Hindware, and against Bureau of Indian Standards guidance on home electrical earthing. Installation costs reflect typical rates across major Indian cities and will vary by location and installer.
Conclusion
A well-installed kitchen chimney performs at full capacity for 8 to 10 years. A poorly installed one underperforms from day one, and most owners never realise the installation is the problem.
The three things that matter most:
Height from the hob: 65 to 75 cm for gas, 55 to 65 cm for induction. Non-negotiable.
Duct quality and route: rigid aluminium, minimum bends, properly sealed joints. Every shortcut here costs you suction.
Earthed socket above the unit: safety first, cord management second.
For ducted installations in concrete-walled Indian homes that need a new duct hole, the Rs. 1,500 to Rs. 2,500 for a professional to do it right is money well spent. For ductless chimneys and ducted models where the hole already exists, DIY is genuinely manageable if you take your time.
Once the chimney is installed and running, the next thing to get right is the maintenance schedule. Our Kitchen Chimney Cleaning Guide covers exactly how often to clean each component and what the process looks like for Indian cooking households. And if you’re still deciding which chimney to buy before installing, the Complete Kitchen Chimney Buying Guide is the place to start.
Drop your installation questions in the comments below. If you describe your kitchen setup and wall type, I’ll point you toward the right approach.